![[스프링 입문] Section 1. 프로젝트 환경설정](https://img1.daumcdn.net/thumb/R750x0/?scode=mtistory2&fname=https%3A%2F%2Fblog.kakaocdn.net%2Fdn%2FclFRsQ%2FbtrXJfx9rtW%2FCAPDmdPhmwIg29QLYAzAA1%2Fimg.png)
1. 프로젝트 생성
📝 사전 준비물
- Java 11 설치
- IntelliJ 설치
1. 스프링 부트 스타터 사이트 이동해서 스프링 프로젝트 생성
2. 프로젝트 선택
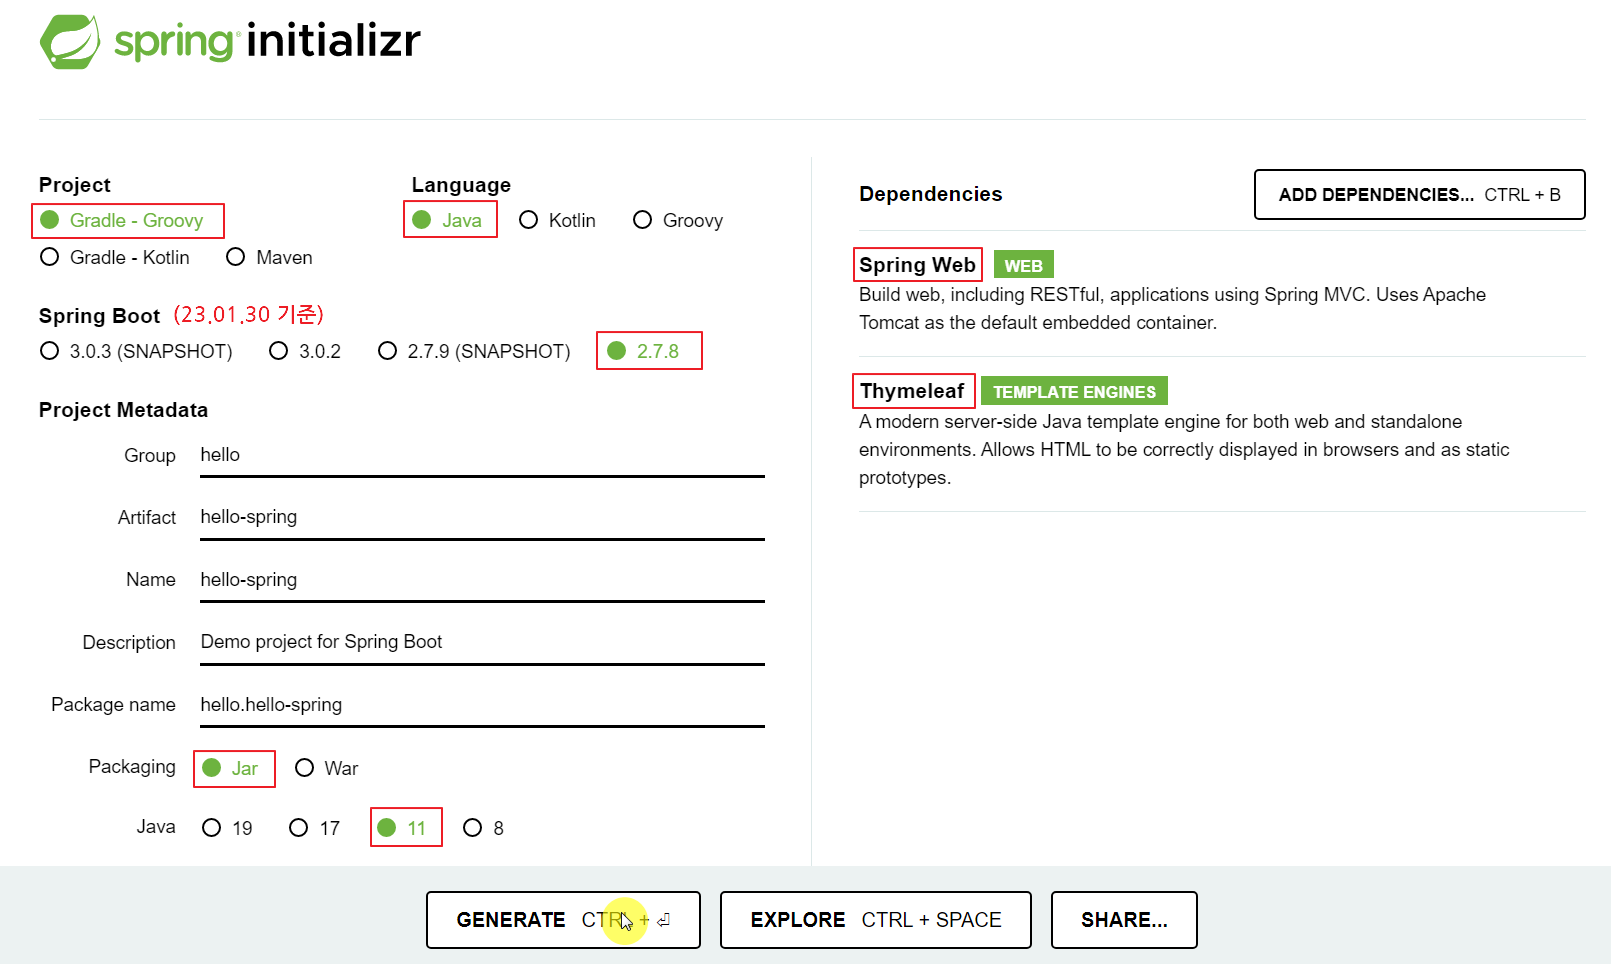
1) Project (빌드 도구 - Maven, Gradle)
빌드는 소스코드 파일들을 컴퓨터에서 실행할 수 있는 소프트웨어로 변환하는 일련의 과정으로 컴파일, 패키징, 테스트, 배포 등의 작업들을 말한다. 빌드 도구는 이러한 빌드 과정을 자동으로 수행해 주는 도구이다.
과거에는 Maven을 주로 사용했고, 요즘에는 Gradle을 사용한다.
(Maven으로 프로젝트를 생성하게 되면 pom.xml이 생성되고, Gradle로 프로젝트를 생성하게 되면 build.gradle, settings.gradle이 생성된다.)
2) Spring Boot
SNAPSHOT, M1 같은 미정식 버전을 제외하고 최신 버전을 사용하면 된다.
3) Project Metadata
- Group : (보통) 기업과 같은 그룹명
- Artifact : 프로젝트명
4) Dependencies
추가하고자 하는 라이브러리를 선택한다.
강의에서는 Spring Web, Thymeleaf를 선택! 추후에는 여러 가지 많이 넣어서 편리하게 사용한다.
2. 프로젝트 실행
1. IntelliJ 실행
2. Open → hello-spring/build.gradle 선택
3. 기본 메인 클래스 HelloSpringApplication 실행
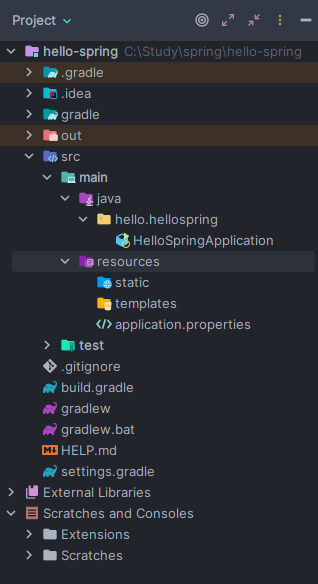
💬 디렉토리 구조
.idea : Intellij가 사용하는 설정 파일
resources : java를 제외한 모든 파일 (html, css, js 등)
test : 테스트 코드 관련 파일
build.gradle : 라이브러리 등의 내용이 포함되어 있음
.gitignore : git에 올라가지 않을 파일 설정 가능
4. http://localhost:8081/ 접속 → 에러페이지가 뜨면 OK
오라클 서버가 8080을 사용하고 있어서 포트번호를 8081로 변경해 주었다.
💬 포트 변경 방법 - resources/application.properties
#서버 포트 번호
server.port=8081

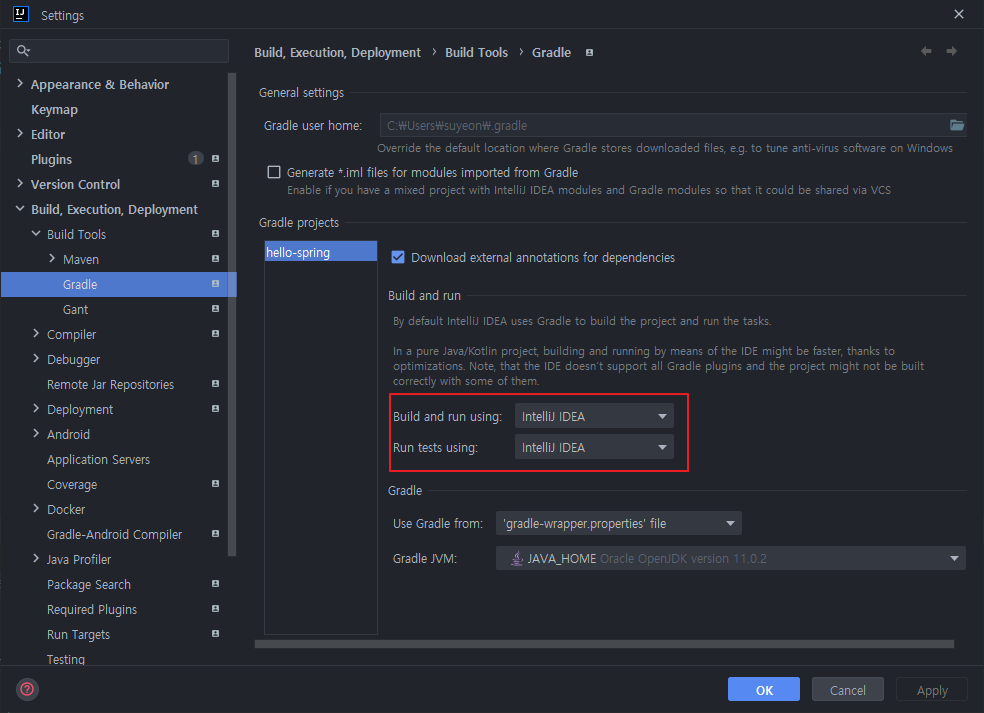
5. IntelliJ Gradle 대신에 자바 직접 실행
최근 IntelliJ 버전은 Gradle을 통해서 실행하는 것이 기본 설정이다. 이렇게 하면 실행속도가 느리다.
다음과 같이 변경하면 자바로 바로 실행해서 실행속도가 더 빠르다.
◦ File → Settings → Build, Execution, Deployment → Build Tools → Gradle
◦ Build and run using : Gradle → IntelliJ IDEA
◦ Run tests using : Gradle → IntelliJ IDEA
3. 라이브러리 살펴보기
Gradle은의존관계가 있는 라이브러리를 함께 다운로드하기 때문에 필요한 것들은 모두 자동으로 추가되어 있다.
1. 스프링 부트 라이브러리
- spring-boot-starter-web
- spring-boot-starter-tomcat : 톰캣 (웹 서버)
- spring-webmvc : 스프링 웹 MVC (Model, View, Controller)
- spring-boot-starter-thymeleaf : 타임리프 템플릿 엔진 (View)
- spring-boot-starter (공통) : 스프링 부트 + 스프링 코어 + 로깅
- spring-boot
- spring-core
- spring-boot-starter-logging
- logback, slf4j
- spring-boot
2. 테스트 라이브러리
- spring-boot-starter-test
- junit : 테스트 프레임워크
- mockito : mock 라이브러리
- assertj : 테스트 코드를 좀 더 편하게 작성하게 도와주는 라이브러리
- spring-test : 스프링 통합 테스트 지원
4. View 환경설정
1. Welcome Page 기능 (정적 페이지)
- resources/static/index.html
<!DOCTYPE HTML>
<html>
<head>
    <title>Hello</title>
    <meta http-equiv="Content-Type" content="text/html; charset=UTF-8" />
</head>
<body>
    Hello
    <a href="/hello">hello</a>
</body>
</html>resources/static/index.html을 올려두면 Welcome page 기능을 제공한다.
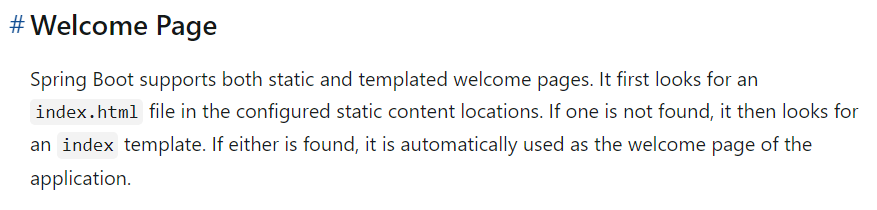
- 스프링 부트는 index.html을 찾고, 없다면 index template를 찾아 자동으로 Welcome page로 사용한다.
- 스프링부트 메뉴얼 : https://docs.spring.io/spring-boot/docs/2.7.8/reference/htmlsingle/#web.servlet.spring-mvc.welcome-page
2. thymeleaf 템플릿 엔진 (동적 페이지)
- thymeleaf 공식 사이트 : https://www.thymeleaf.org/
- 스프링 공식 튜토리얼 : https://spring.io/guides/gs/serving-web-content/
- 스프링부트 메뉴얼 : https://docs.spring.io/spring-boot/docs/2.7.8/reference/htmlsingle/#web.reactive.webflux.template-engines
- java/hello.hellospring → controller package 생성 → HelloController 자바 클래스 생성
@Controller // 컨트롤러에 필요함
public class HelloController {

    @GetMapping("hello")  // "/hello"로 들어오면 이 메서드를 호출해준다.
    public String hello(Model model){
        model.addAttribute("data", "hello!!"); // data로 hello!!가 들어간다. key : value 쌍으로 전달됨.
        return "hello";  // hello.html로 넘어가도록 한다.
    }
}- resources/templates/hello.html 생성 (thymeleaf 이용)
<!DOCTYPE HTML>
<html xmlns:th="http://www.thymeleaf.org">
<head>
<title>Hello</title>
<meta http-equiv="Content-Type" content="text/html; charset=UTF-8" />
</head>
<body>
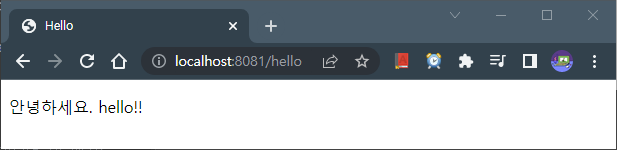
<p th:text="'안녕하세요. ' + ${data}" >안녕하세요. 손님</p>
</body>
</html>- thymeleaf 템플릿엔진 동작 확인
- 실행 : http://localhost:8081/hello
3. 동작 환경 이미지
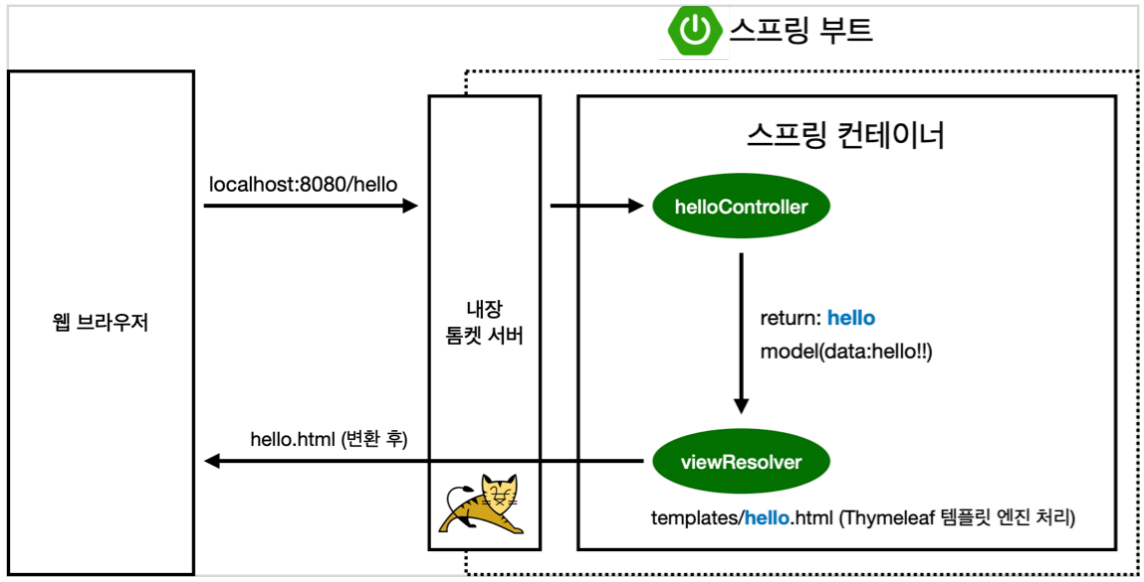
1. localhost:8080/hello를 입력하면, 내장 톰캣 서버가 컨트롤러에서 Get으로 매핑되어 있는 hello라는 메서드를 찾아 실행시킨다.
2. 컨트롤러에서는 model이라는 객체에 값을 담을 수 있다. key : value 형태로 data : hello!! 를 담고 hello로 리턴한다.
- Controller : 요청에 따라 비즈니스 로직 처리를 위한 분기 담당 및 응답 View 리턴
3. 뷰 리졸버(viewResolver)에서 리턴된 hello와 대응되는 templates의 html파일을 찾아 처리한다.
- 스프링 부트 템플릿엔진 기본 viewName 매핑
resources:templates/+ {ViewName} +.html- viewResolver : 응답 view를 렌더링하는 역할로, view 이름으로부터 view 객체를 매핑하는 역할
4. spring-boot-devtools 라이브러리 추가하기
spring-boot-devtools 라이브러리 추가 시, html 파일을 컴파일만 해주면 서버 재시작 없이 View 파일 변경이 가능하다.
1. build.gradle 파일에 spring-boot-devtools 의존성을 추가한다.
dependencies {
developmentOnly("org.springframework.boot:spring-boot-devtools")
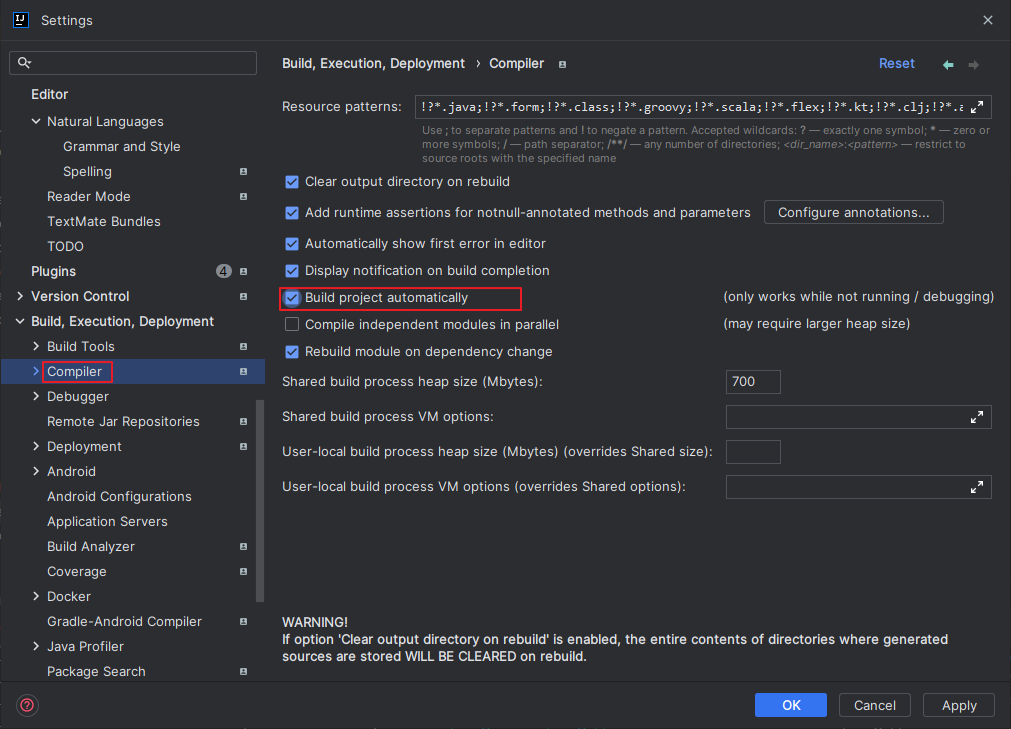
}2. File → Settings → Build, Execution, Deployment → Compiler 에서 Build project automatically 옵션을 활성화한다.
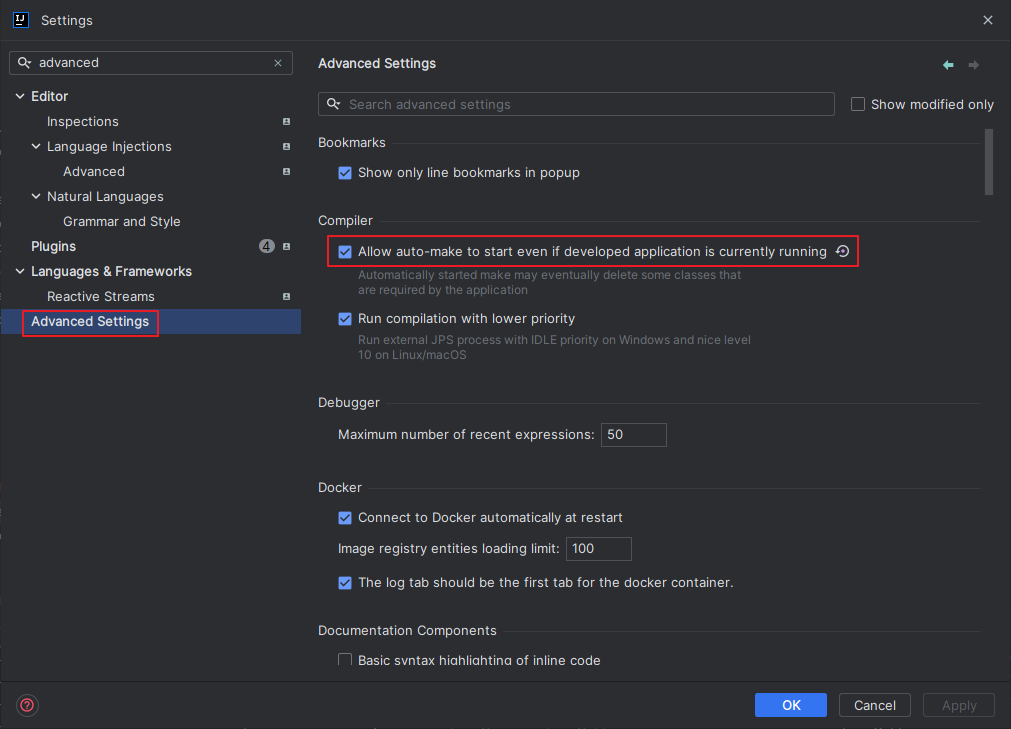
3. File → Settings → Advanced Settings 에서 Allow auto-make to start even if developed application is currently running 옵션을 활성화한다.